
This will guide you though setting up a "live event" in Teams, which is a meeting type for larger meetings, it was an interesting thing to do, so here is an entry about it to help other people, first ensure you have the relevent ports open as below in the warning....
Caution: Ensure you open TCP port 80 and 443 from clients to the internet and UDP port ranges for 3478-3481 from the client to the internet for live stream events.
Teams : Live Stream
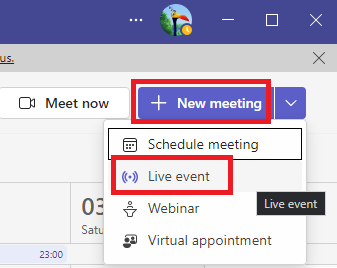
Navigate to the Calendar options in your Teams application
Then you need "New Meeting" then "Live Event" as below:
You will then see the "Live Event" setup fill this is as required, however under "Invite Presenters" remember that you only need to invite presenters, normal attendees will not require adding here.
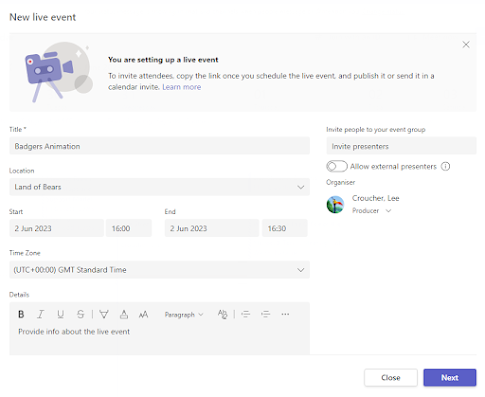
Then under "Organiser" you will get two options, one "Producer" and one "Presenter" you will need the producer for this example as that will give full control to the "queue" and "live stream" - you can read more about that here

You will then see the "Live Event" setup fill this is as required, however under "Invite Presenters" remember that you only need to invite presenters, normal attendees will not require adding here.
Then under "Organiser" you will get two options, one "Producer" and one "Presenter" you will need the producer for this example as that will give full control to the "queue" and "live stream" - you can read more about that here
Once you have that all ready click Next where you will get some options, lets go though them one by one:
Live Event Permissions
This tells you who can join this live stream, the public option is disabled by a policy I have in my lab, but if you have no policy you can make it public, however here I need "org-wide" which means anyone in your company can visit and view the live stream after login (obviously)

Production Mode
This sounds far more jazzy than it is, this basically tells teams what mode you would like it in, for this I have chosen Teams - as for Teams Encoder you need a service like Azure CDN or a 3rd party service which can find out more about here

Event Options
This is where you can set the options and yes under translation you do see "Klingon" you can enable these where required for your unique preferences.
 Summary Screen
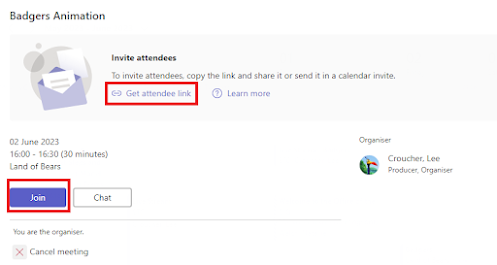
Once complete you will get the summary information, where you can get the attendee link which is required to join, you do not add people to this meeting excusing producer and presenters.

When you view this meeting in teams there is no join button as its a live stream, to join this meeting you will be required to click on the meeting....
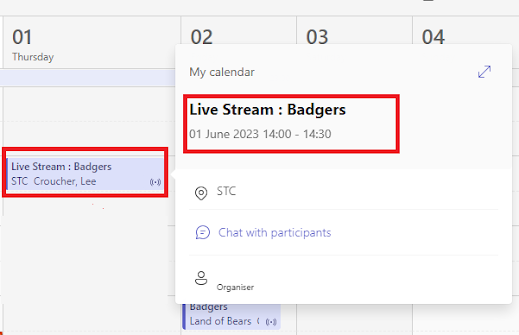
When you open the meeting as the Producer you will then see the "Join" button, but attendees will need the link to join which you can get with the link at the top of the image below:
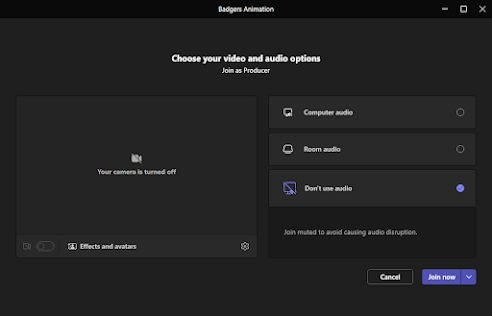
When as the Producer you click the join button you will be given the options below, here for this example I will join with no audio as an example......
Once joined it will not look like a normal teams meeting, you will get a "Queue" and a "Live Event" which is different, so lets get that setup, this is done by the share option...
Note: The content in queue is not live to users, once happy click the "send live" to make it live for all the attendees, nothing is live without button being clicked, as the producer that is your job!

Click on the share option as below:

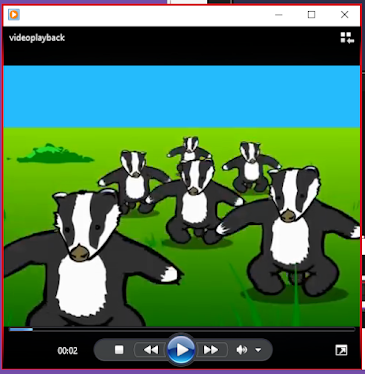
Then at the bottom of the windows you will see the share options, here I would like to share the "badgers animation" which is shown below:

Click on that and you should get the "red border" around it...
Then back in teams from the content option at the bottom of the window, you will see I now have content to present, nice
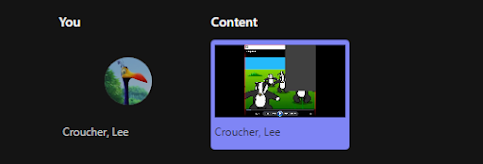
Double click that content to get it Queue view like this, it will also tell you where it comes from as you can see below.....

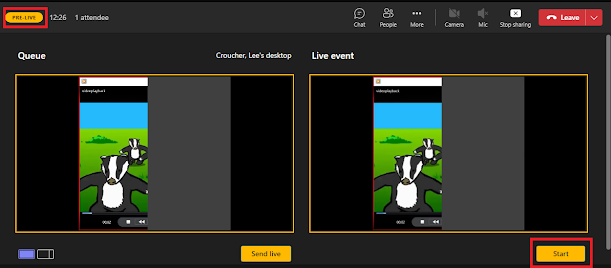
You will notice the event is still pre-live with the badgers in the queue and the "Live Event" which people see is still "not started" which is good.....
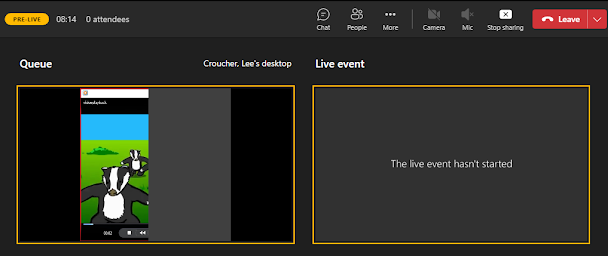
You will notice under the Queue you have "send live" which will send it live to the all the people on the meeting, that is shown below, when happy click that button.......

That will then look like this, so this confirms you now have the "live feed" showing the badger which is a video but cannot be shown on a blog......notice you are still "pre-live" - if you wish to start the event click start as shown below......
You will then be notified with an are you sure, and you will get the warning that attendees will watch with a 10-20 second delay depending on bandwidth, but it more like 5 seconds when you get it going.....

Once you agree to that you will notice you are live and all is good, however if you wish to end the live stream use the "End button"

Warning: If you click the end button you will need to restart the stream to go live again that is covered below!
End/Restart Stream
If you end the event and then wish to "go live" again you cannot without some updates to the event

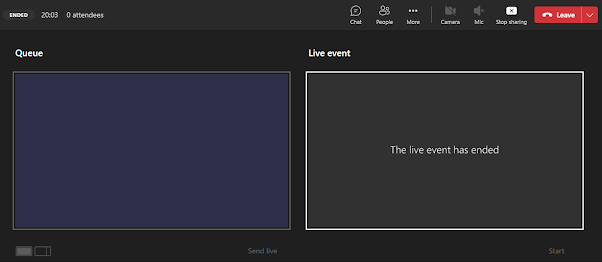
Once you confirm this you event will "end" and you will notice your "Queue" will clear itself and the "Live event" will say "ended"
If you wish to restart however then you require More>Streaming>Restart event

This will then confirm you action with a warning, if you wanted to keep the recording, caoptions and transcript you should not have stopped the recording - lol.

Once you do restart Teams will issue that command:

You will then need to re-join the meeting as you did before, for me this is with "no audio"

Then you will notice you are "pre-live" with the meeting ready for production, so you can start again.
Live Event Permissions
This tells you who can join this live stream, the public option is disabled by a policy I have in my lab, but if you have no policy you can make it public, however here I need "org-wide" which means anyone in your company can visit and view the live stream after login (obviously)
Production Mode
This sounds far more jazzy than it is, this basically tells teams what mode you would like it in, for this I have chosen Teams - as for Teams Encoder you need a service like Azure CDN or a 3rd party service which can find out more about here
Event Options
This is where you can set the options and yes under translation you do see "Klingon" you can enable these where required for your unique preferences.
Once complete you will get the summary information, where you can get the attendee link which is required to join, you do not add people to this meeting excusing producer and presenters.
When you view this meeting in teams there is no join button as its a live stream, to join this meeting you will be required to click on the meeting....
When you open the meeting as the Producer you will then see the "Join" button, but attendees will need the link to join which you can get with the link at the top of the image below:
When as the Producer you click the join button you will be given the options below, here for this example I will join with no audio as an example......
Once joined it will not look like a normal teams meeting, you will get a "Queue" and a "Live Event" which is different, so lets get that setup, this is done by the share option...
Note: The content in queue is not live to users, once happy click the "send live" to make it live for all the attendees, nothing is live without button being clicked, as the producer that is your job!
If people join the meeting as attendees they will get this, which reflects the live view which is all amazing...

Then at the bottom of the windows you will see the share options, here I would like to share the "badgers animation" which is shown below:
Click on that and you should get the "red border" around it...
Then back in teams from the content option at the bottom of the window, you will see I now have content to present, nice
Double click that content to get it Queue view like this, it will also tell you where it comes from as you can see below.....
You will notice the event is still pre-live with the badgers in the queue and the "Live Event" which people see is still "not started" which is good.....
You will notice under the Queue you have "send live" which will send it live to the all the people on the meeting, that is shown below, when happy click that button.......
That will then look like this, so this confirms you now have the "live feed" showing the badger which is a video but cannot be shown on a blog......notice you are still "pre-live" - if you wish to start the event click start as shown below......
You will then be notified with an are you sure, and you will get the warning that attendees will watch with a 10-20 second delay depending on bandwidth, but it more like 5 seconds when you get it going.....
Once you agree to that you will notice you are live and all is good, however if you wish to end the live stream use the "End button"
Warning: If you click the end button you will need to restart the stream to go live again that is covered below!
End/Restart Stream
If you end the event and then wish to "go live" again you cannot without some updates to the event
Once you confirm this you event will "end" and you will notice your "Queue" will clear itself and the "Live event" will say "ended"
If you wish to restart however then you require More>Streaming>Restart event
This will then confirm you action with a warning, if you wanted to keep the recording, caoptions and transcript you should not have stopped the recording - lol.
Once you do restart Teams will issue that command:
Using the Queue
If you wish to queue content up to use next then as the producer, at the bottom of the preview windows choose the content left icon as below:
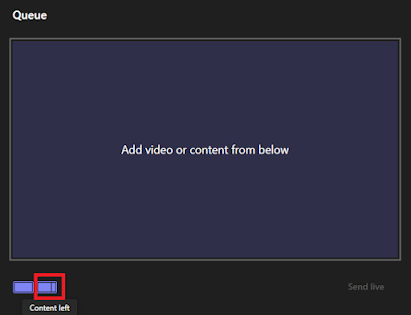
This will then give the option to "queue" content in the "queue" so if you have the main slides on the live stream and someone wishes to share their screen, you can pick it from the menu
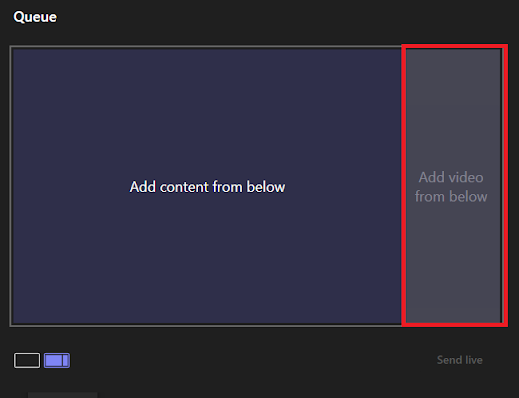
This means once you have content live you can choose content from the bottom and move it to the "add video from below" here I only have one video to share, but when you get more you can drag and drop or double click the video to queue it up then click the "make live" to blast it to the attendees.

Enjoy your live stream meeting, hope this helps people out.
This will then give the option to "queue" content in the "queue" so if you have the main slides on the live stream and someone wishes to share their screen, you can pick it from the menu
This means once you have content live you can choose content from the bottom and move it to the "add video from below" here I only have one video to share, but when you get more you can drag and drop or double click the video to queue it up then click the "make live" to blast it to the attendees.