

Remote Desktop Protocol (RDP) access to your Kali Linux virtual machine can significantly enhance your penetration testing workflow, especially when running Kali in a remote environmentif you are after a "desktop experience" then this enables powerful remote management capabilities - however I myself prefer the shell.
In this guide I will guide you step-by-step through the complete installation and configuration of xrdp on Kali Linux so it works after the guide.
Why Use xrdp with Kali Linux?
xrdp provides a seamless way to access your Kali Linux desktop environment remotely using the familiar Windows Remote Desktop Connection client or any RDP-compatible software, which can then be accessed via the Remote Desktop Client.
Prerequisites
Before we begin, ensure you have:
- Kali Linux VM properly installed
- Root or sudo access to the Kali Linux system
- Network connectivity between your client machine and the Kali VM
Step-by-Step Installation Guide
Step 1: System Updates
Start with a fresh system update to ensure compatibility:
sudo apt update
sudo apt full-upgrade -y
This ensures all packages are current and reduces potential compatibility issues with xrdp components.
Step 2: Install Core Packages
Install the essential packages for xrdp functionality:
sudo apt install -y kali-desktop-xfce xorg xrdp xorgxrdp
For minimal installations, you may also need the D-Bus X11 library:
sudo apt install -y dbus-x11
The package breakdown:
- kali-desktop-xfce: Lightweight desktop environment optimized for remote access
- xorg: X Window System for graphical interface
- xrdp: The core RDP server implementation
- xorgxrdp: Enhanced X11 drivers for better RDP integration
Step 3: Service Configuration
Enable and start the xrdp service to ensure it runs automatically:
sudo systemctl enable xrdp
sudo systemctl start xrdp
Verify the service is running:
sudo systemctl status xrdp
Step 4: Security Configuration
Add the xrdp user to the SSL certificate group to prevent authentication issues:
sudo adduser xrdp ssl-cert
This step is crucial for avoiding blank screen problems during RDP sessions.
Step 5: Firewall Configuration
If you're running a firewall, open the standard RDP port:
sudo ufw allow 3389/tcp
For enhanced security, consider using a non-standard port by modifying /etc/xrdp/xrdp.ini.
Step 6: User Account Management
Important: You cannot use the same user account for both local console and RDP sessions simultaneously. Choose one of these approaches:
Option A: Create a Dedicated RDP User
sudo adduser rdpuser
sudo usermod -aG sudo rdpuser
Option B: Enable Existing account
sudo usermod -aG sudo <account>
Step 7: Service Restart
Apply all configuration changes:
sudo systemctl restart xrdp
Establishing RDP Connection
- Press
Windows + Rand typemstsc - Enter your Kali VM's IP address
- Click "Connect"
- Authenticate with your created user credentials

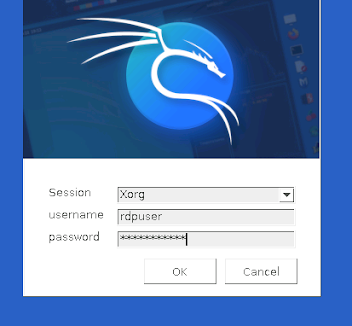
If you have create a rdpuser then you can login with those details as below:
Then you will be logged in with a desktop, just like Windows:

Remember to logoff your session when you are done, it you close it and do not logoff you will not be able to login again, this will require this command running from the shell:
Advanced: Custom Port Configuration?
For enhanced security, modify the default RDP port by editing /etc/xrdp/xrdp.ini:
[globals]
port=3390
Remember to update firewall rules accordingly.
Advanced : Custom SSL/TLS Security
xrdp uses TLS encryption by default, but you can enhance security by configuring custom certificates in /etc/xrdp/.
Advanced : Multiple Session Management
To allow multiple concurrent sessions, edit /etc/xrdp/startwm.sh and add session management configurations before the Xsession execution lines.
Troubleshooting Common Issues
Lets go though common issues that can occur.....
Blank Screen After Connection
Symptom: RDP connects but shows only a blank desktop
Solution:
- Ensure xrdp is added to ssl-cert group
- Verify no local user session is active
- Restart xrdp service
Connection Refused
Symptom: Cannot establish RDP connection
Solution:
- Check xrdp service status:
sudo systemctl status xrdp - Verify firewall settings
- Confirm network connectivity
Performance Issues
Symptom: Slow or laggy remote desktop performance
Solution:
- Increase RAM allocation
- Use lightweight desktop environments (XFCE recommended)
Authentication Failures
Symptom: Credentials rejected during RDP login
Solution:
- Verify user account credentials
- Check user is not logged in locally
- Ensure proper group memberships