

Warning : this particular example took quite a few twists and ended up going quite deep to figure out what caused the problem, when doing debug analysis sometimes you have to eliminate all the options until you find the problem that causing the crash 💥 - you will find the action plan to restore service will take many interesting turns.
WinDbg on the Dump file
Now get the dump file to the server with WinDbg with the same folder path as earlier which is c:\DMP-file once here it should look like this, and this will be the crash dump file we are analysing right now:

Then start up WinDbg and ensure you have setup the symbols search path as outlined earlier in this guide, but for reference it should be this :
SRV*C:\SymCache*http://msdl.microsoft.com/download/symbols
Then you want to File > Open Crash Dump and choose the memory.dmp in out folder as below:

Then it will analyse the DMP file and get the symbols as required give this a moment that will look like this, maybe not exactly but something similar:

Then start up WinDbg and ensure you have setup the symbols search path as outlined earlier in this guide, but for reference it should be this :
SRV*C:\SymCache*http://msdl.microsoft.com/download/symbols
Then you want to File > Open Crash Dump and choose the memory.dmp in out folder as below:
Then it will analyse the DMP file and get the symbols as required give this a moment that will look like this, maybe not exactly but something similar:
Then as before in the debugging command section we need to enter this:
!analyze -v
!analyze -v
This is shown below:

When you press enter it will get to work and you will see the Bug check analysis and you will notice it will say *BUSY* at the debugger command prompt then we can see this data, as this means it has bug checked with a code 5 - which is access denied, in kernel address space, this is to be expected
Then in the stack trace you will see this, the first one (in red) called the KeBugCheckEx which is why Windows crashed, then the proceeding data shows what went wrong.....
However if you look further down you get that the system is loading a driver but it reporting as ntkrnlmp.exe which is not right, which means whatever is loading is crashing before its loaded into memory:
That is not a good sign, we we need to get these signed again, so to complete this extract the files from the install media or copy from another server to the same build level, I created a folder called "sys" that had all the files inside it like this:

Now we need to replace these files with the ones in C:\Windows\System32\drivers but its not the simple as "TrustedInstalled" will get in the way of that, as it will protect the files, you need to get a command prompt as "system" so if you have "psexec" installed you can use this command:
psexec.exe -s -i cmd.exe

Then ensure the command has worked with the command "whoami" and that should say "system" as below:

Then navigate to the directory C:\Windows\System32\drivers in that window can you need to rename all the existing files in that directory to prefix "old_" before them, to do this used these commands:

Well no, we have missed a driver here in the subfolder UMDF, so lets get that replaced as well, which is the same process as above, but when we do replace the file the results are the same, even when that files comes from a servers that passes the test?

In this case TSS did not help with the issue it made it more confusing, but its better to check and confirm.
When you press enter it will get to work and you will see the Bug check analysis and you will notice it will say *BUSY* at the debugger command prompt then we can see this data, as this means it has bug checked with a code 5 - which is access denied, in kernel address space, this is to be expected
FILE_IN_CAB: MEMORY.DMP
BUGCHECK_CODE: 5a
BUGCHECK_P1: 1
BUGCHECK_P2: ffff9907c7d23060
BUGCHECK_P3: ffffd50fe22139c0
BUGCHECK_P4: ffffffffc0000428
PROCESS_NAME: System
Then in the stack trace you will see this, the first one (in red) called the KeBugCheckEx which is why Windows crashed, then the proceeding data shows what went wrong.....
STACK_TEXT:
ffffe600`2dd86948 fffff803`e41bf3e4 : 00000000`0000005a 00000000`00000001 ffff9907`c7d23060 ffffd50f`e22139c0 : nt!KeBugCheckEx
ffffe600`2dd86950 fffff803`e43b30ef : ffff9907`c766e8e0 ffff9907`c766e8e0 ffffe600`2dd86b80 ffff9907`00000004 : nt!IopLoadDriver+0x132488
ffffe600`2dd86b20 fffff803`e439d87e : fffff803`00000000 ffffd50f`debfc220 00000000`00000000 fffff803`e222dcd0 : nt!IopInitializeSystemDrivers+0x137
ffffe600`2dd86bb0 fffff803`e4159304 : fffff803`e222dcd0 fffff803`e222dcd0 fffff803`e41592c8 fffff803`e222dcd0 : nt!IoInitSystem+0x16
ffffe600`2dd86be0 fffff803`e3ca0a39 : ffff9907`c70ab780 fffff803`e41592c8 fffff803`e3f4f180 ffff9907`c70ab780 : nt!Phase1Initialization+0x3c
ffffe600`2dd86c10 fffff803`e3d71916 : fffff803`e3f4f180 ffff9907`c70ab780 fffff803`e3ca09f8 0615820f`01f983ff : nt!PspSystemThreadStartup+0x41
ffffe600`2dd86c60 00000000`00000000 : ffffe600`2dd87000 ffffe600`2dd81000 00000000`00000000 00000000`00000000 : nt!KiStartSystemThread+0x16
However if you look further down you get that the system is loading a driver but it reporting as ntkrnlmp.exe which is not right, which means whatever is loading is crashing before its loaded into memory:
SYMBOL_NAME: nt!IopLoadDriver+132488
MODULE_NAME: nt
IMAGE_NAME: ntkrnlmp.exe
IMAGE_VERSION: 10.0.14393.6795
The stack trace suggests that there is a failure occurred during the loading of a driver (nt!IopLoadDriver). This could indicate an issue with a specific driver or a corruption within the driver files.
This does not give us much to go on really, so lets dig a little deeper lets boot the server with "nointegritychecks" and checks enabled, and see if the server can boot this can be done with the command:
bcdedit.exe /set nointegritychecks on
bcdedit.exe /set nointegritychecks on
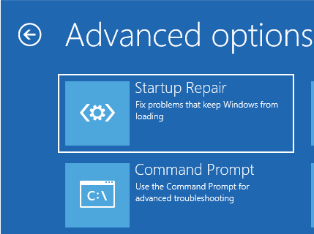
If the server fails to boot in safe mode, like this one does from the F8 menu you can choose the options for “Disable Driver Signature Enforcement” this will allow the server to boot.
Then we need to check the Code Integrity event log (Microsoft-Windows-CodeIntegrity >Operational.evtx) and identify the number of impacted components (warning 3001/ 3010) here you can see them below:

We now need to get F8 appearing without pressing F8 on boot so you can do this with the commands below, this will mean you can choose the required options below when we get there:
We now need to get F8 appearing without pressing F8 on boot so you can do this with the commands below, this will mean you can choose the required options below when we get there:
bcdedit /set {default} advancedoptions true
Then you need to restart the machine and select “Disable Driver Signature Enforcement” now we need to fix all the unsigned drivers using "sigverif" which will identify the drivers so we replace the damaged file(s).
From the "run" dialogue you need to run "sigverif" like this:

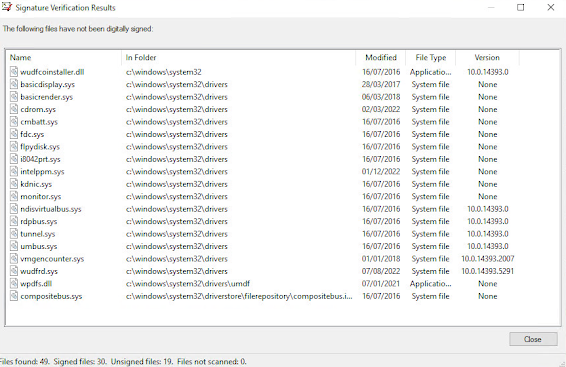
This will show you the file verification utility as below, when you click start it will scan all the system drivers and report of their status, so click Start....

This will show you the file verification utility as below, when you click start it will scan all the system drivers and report of their status, so click Start....
Once the scan finishes, you should get a dialogue prompt like this meaning everything is signed as valid:

However for this example we do not get this, we get list of drivers that are not signed as you can see from below:
That is not a good sign, we we need to get these signed again, so to complete this extract the files from the install media or copy from another server to the same build level, I created a folder called "sys" that had all the files inside it like this:
Now we need to replace these files with the ones in C:\Windows\System32\drivers but its not the simple as "TrustedInstalled" will get in the way of that, as it will protect the files, you need to get a command prompt as "system" so if you have "psexec" installed you can use this command:
psexec.exe -s -i cmd.exe
If you do not have that installed you can also use a utility called "advanced run" which you can get from here - once downloaded run this tools and set it up like this, once done click the "run" button.
Then ensure the command has worked with the command "whoami" and that should say "system" as below:
Then navigate to the directory C:\Windows\System32\drivers in that window can you need to rename all the existing files in that directory to prefix "old_" before them, to do this used these commands:
ren BasicDisplay.sys old_BasicDisplay.sys
ren BasicRender.sys old_BasicRender.sys
ren cdrom.sys old_cdrom.sys
ren CmBatt.sys old_CmBatt.sys
ren CompositeBus.sys old_CompositeBus.sys
ren fdc.sys old_fdc.sys
ren flpydisk.sys old_flpydisk.sys
ren i8042prt.sys old_i8042prt.sys
ren intelppm.sys old_intelppm.sys
ren kdnic.sys old_kdnic.sys
ren monitor.sys old_monitor.sys
ren NdisVirtualBus.sys old_NdisVirtualBus.sys
ren rdpbus.sys old_rdpbus.sys
ren umbus.sys old_umbus.sys
ren vmgencounter.sys old_vmgencounter.sys
ren WUDFRd.sys old_WUDFRd.sys
Now these files are re-named you can copy the extracted files to the same directory, and then you have in theory fixed the issues with the signed drivers, or have you?
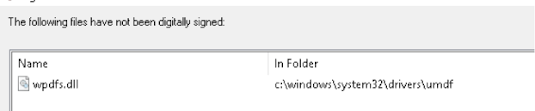
Well no, we have missed a driver here in the subfolder UMDF, so lets get that replaced as well, which is the same process as above, but when we do replace the file the results are the same, even when that files comes from a servers that passes the test?
<more required here>
Windows SFC/DISM
When you replace drivers and system drivers its also recommended to use DISM and SFC to check and/or repair the system files with the commands below, but that gives it some issues as well in this case:
sfc /scannow
This command : DISM /Online /Cleanup-Image /RestoreHealth detected no problems at all as you can see below:
Deployment Image Servicing and Management tool
Version: 10.0.14393.4169
Image Version: 10.0.14393.4169
No component store corruption detected.
The operation completed successfully.
However this command : DISM /online /Cleanup-Image /CheckHealth did do some repairs but it also did not fix the issue and everytime the command is run it does a "repair" that does not "repair" the system, as you can see below:
Deployment Image Servicing and Management tool
Version: 10.0.14393.4169
Image Version: 10.0.14393.4169
[==========================100.0%==========================] The restore operation completed successfully.
The operation completed successfully.
CatRoot Folder
The Dump file also points to the fact that a folder under CatRoot might be missing files, when I look this folder is down about 5,600 files and folders, so I find a CatRoot from a similar machine and copy them to this folder:
C:\Windows\System32\CatRoot\{F750E6C3-38EE-11D1-85E5-00C04FC295EE}
C:\Windows\System32\CatRoot\{F750E6C3-38EE-11D1-85E5-00C04FC295EE}
This was discovered using command in Windows Debugging:
0: kd> !mex.mdir fffff2849a9beb40
C:\Windows|System32\CatRoot\{F750E6C3-38EE-11D1-85E5-00C04FC295EE}
This particular directory needed to be copied from a working server with the same operating system as the target, in theory DISM should’ve fixed these problems, but failed to do so.
This also still does not fix the issue, let’s move on to the next logic point.
Sentinel HASP Drivers
I also found this article on the internet about old HASP drivers causing possible blue screens in Windows, this was with another piece of software called ePrime which we were not using but the fact that HASP drivers can cause BSOD events was interesting, this is the aricle:
https://support.pstnet.com/hc/en-us/articles/360049536493-ERROR-HASP-driver-issues-on-Windows-10-version-2004-20H2-21H1-21H2-and-11-35173
https://support.pstnet.com/hc/en-us/articles/360049536493-ERROR-HASP-driver-issues-on-Windows-10-version-2004-20H2-21H1-21H2-and-11-35173
That seemed to be advice about keeping the HASP drivers to up to date, and our devices in this instance were not up to date, they were out of day by about 6 years, the links I used for the new drivers are below, the first is the "GUI" installed and the second is for the system drivers, which is the route I used:
F8 : Advanced boot automatically
During troubleshooting the last thing you want to be doing is remembering to have to press F8 to get the advanced boot menu, because in this particular scenario, you need to make sure you disable enforcement otherwise the server will failed to boot, therefore, let’s get that as the default option.
This was covered earlier but you need to startup in repair mode, if this fails to start you can apply the DVD or ISO to drive and boot off that, once you get here choose the option for Troubleshoot:

Then you want the option for "command prompt" even though below its stays startup repair:
Then choose the local account and enter the password then when at a command prompt you need this command:
bcdedit /set {default} advancedoptions true
Then you want the option for "command prompt" even though below its stays startup repair:
Then choose the local account and enter the password then when at a command prompt you need this command:
bcdedit /set {default} advancedoptions true
Once that is confirm then enter this command to check its saved:
bcdedit /enum
You are looking for the "advacnedoptions" being set to yes as below:

Then when your server boots you can toggle between the two options as below:

Missing Hotfix
bcdedit /enum
You are looking for the "advacnedoptions" being set to yes as below:
Then when your server boots you can toggle between the two options as below:
Missing Hotfix
It was also reported that one of the hot fixes seem to be missing from this particular server, while this is not a diagnostic technique I like because they change monthly, and this usually turns out to become a ticking boxes exercise in troubleshooting, in this particular case with a windows installation that doesn’t seem to be happy, it is not such a bad call.
In this case the TSS report was wrong and the hotfix was installed, but even without Microsoft support this is a good tool to check for the health of the server.......
In this case TSS did not help with the issue it made it more confusing, but its better to check and confirm.
Disable the faulty driver from the Registry
If you remember back to this single unsigned driver, this was the driver that always reverted back to unsigned, even after being replaced.....well there is a fix for that as well.

Change the ‘Start’ key to 4, this means the drivers disabled and Windows will not try to load it up, like this:

Navigate to HKEY_LOCAL_MACHINE\SYSTEM\CurrentControlSet\Services then from there seach for the name of the driver.
You will notice the Start is set to a "3" which is enabled:
Change the ‘Start’ key to 4, this means the drivers disabled and Windows will not try to load it up, like this:
This does fix the "sigverif" as you can see here:

This however does not the the BSOD when Windows is booted with driver enforcement disabled, so this means that the BSOD may not be caused by drivers, to to fix the cause of this issue we now need to turn to ProcMon
Procmon : Boot Logging
We now need to use Procmon to monitor the processes starting on boot to try to find the faulty driver or process causing the issues, first you need to get Procmon which can you do from here
Once you have downloaded this you will get a x32 and a x64 version we will be using the x64 version for this example,
You need to run the application as an administrator, so you need to right click the executable and choose "run as administrator"

When the application starts it may give you the filter view, if it does click OK we can click OK as below:

Once you click this OK button it will start to capture events we need to stop this for now, so click on File then choose Capture Events to stop the capture as below:

Then once stopped click on Options the Boot Logging

The under the boot logging options you need to ensure that the "every second" option is selected, once this is done you will then need to reboot the computer........

Once you click this OK button it will start to capture events we need to stop this for now, so click on File then choose Capture Events to stop the capture as below:
Then once stopped click on Options the Boot Logging
The under the boot logging options you need to ensure that the "every second" option is selected, once this is done you will then need to reboot the computer........
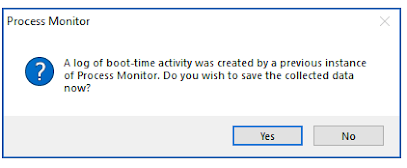
In this example we will need to reboot the computer with driver enforcement disabled still, else the computer will not boot, once booted allow the computer to startup and then run Procmon again and you will see this message:
You will need to save that file to a location then it will be created, as below:
Once saved you will see the file in the folder you selected, below you can see the raw file called "bootlog" and then the zipped file called "bootlog.zip" - they zip up very well indeed.

 Then start a command prompt as an administrator like this:

Excellent, that has also fixed all the other problems with many other files as well, so now is the moment of truth, now we need to take the system out of "advanced boot" mode with this commands (that needs to be run in admin mode)

You will need to save that file to a location then it will be created, as below:
Once saved you will see the file in the folder you selected, below you can see the raw file called "bootlog" and then the zipped file called "bootlog.zip" - they zip up very well indeed.
This will then allow you to analyse all the files that are loaded during boot up to see if there are any inconsistencies.
SigCheck Checker
When Windows fails to boot, sometimes it can be a problem with the signing and the catalogue linkage that does the signing, we breifly covered this folder earlier : C:\Windows\System32\CatRoot\{F750E6C3-38EE-11D1-85E5-00C04FC295EE}
However how can you confirm everything is signed and linked to the catalogue that does the signing, well with SigCheck from Sysinternals from this link
Download the file and when you extract it you will see these files in the folder, we need the sigcheck.exe, I copied this to the c:\Windows\System32 directory:
Then when loaded we want to run this command on filecrypt.sys as this files is critical for Windows in order to boot but this file in particular as it was in the CodeIntergiry event log as you can see below:
sigcheck -i C:\Windows\System32\drivers\filecrypt.sys
[Microsoft-Windows-CodeIntegrity/3004v0] Windows is unable to verify the image integrity of the file \Device\HarddiskVolume2\Windows\System32\drivers\filecrypt.sys because file hash could not be found on the system. A recent hardware or software change might have installed a file that is signed incorrectly or damaged, or that might be malicious software from an unknown source.
[({2d9f3a42-01d4-4733-97f7-041e8021dc84}, 0)]: Decoding error: 1168
So lets start with that file
sigcheck -i C:\Windows\System32\drivers\filecrypt.sys
That should return something like this where you can see the file is Signed and then linked to the catalogue that has signed it, this is good:

However we do not get that, we get this. which shows the driver unsigned as you can see below:

This is not good, and upon checking other files that are required for Windows these are also all unsigned and not linked to a catalogue, no wonder Windows was having issuing booting and failing, so to fix this we need to copy the files from the serving catalogue with this command:
xcopy C:\Windows\servicing\Packages\*.Cat C:\Windows\System32\CatRoot\{F750E6C3-38EE-11D1-85E5-00C04FC295EE}
However we do not get that, we get this. which shows the driver unsigned as you can see below:
This is not good, and upon checking other files that are required for Windows these are also all unsigned and not linked to a catalogue, no wonder Windows was having issuing booting and failing, so to fix this we need to copy the files from the serving catalogue with this command:
xcopy C:\Windows\servicing\Packages\*.Cat C:\Windows\System32\CatRoot\{F750E6C3-38EE-11D1-85E5-00C04FC295EE}
Wait for that to complete, then once it was you can run this again as the file to test:
sigcheck -i C:\Windows\System32\drivers\filecrypt.sys
sigcheck -i C:\Windows\System32\drivers\filecrypt.sys
Now, we get this as the output:
Verified: Signed
Catalog: C:\WINDOWS\system32\CatRoot\{F750E6C3-38EE-11D1-85E5-00C04FC295EE}\Package_1257_for_KB5036899~31bf3856ad364e35~amd64~~10.0.1.27.cat
Excellent, that has also fixed all the other problems with many other files as well, so now is the moment of truth, now we need to take the system out of "advanced boot" mode with this commands (that needs to be run in admin mode)
bcdedit /set advancedoptions no
bcdedit /set nointegritychecks No
Then reboot Windows, which will tell Windows to boot in normal mode with drive enforcement enabled as it should be.
Windows now successfully boots, while that was a large amount of troubleshooting now you know the cause its easy to check for the next time, well worth the investigation in my experience.