If you have Office 365 or EXO as your primary mail solution and you then use an Integrate Cloud Email Security or ICES solution to route e-mail via that solution and you keep you MX record as EXO/EOP then you can get a problem where you can "fail" SPF - and not a "soft fail" but a hard fail.
This is the headers can look something like this, you will see the name of your ICES gateway here not the placeholder I have assigned for the value <ICES_Gateway>
Received-SPF: Fail (protection.outlook.com: domain of microsoft.com does not
designate <ICES_Gateway> as permitted sender) receiver=protection.outlook.com;
client-ip=<ICES_Gateway>; helo=<ICES_FQDN>;
Received: from <ICES_FQDN> (x.x.x.x) by
DU6PEPF0000A7DF.mail.protection.outlook.com (10.167.8.36)
The problem
Well this one needs a simple flow or how mails works before you use ICES and that for many companies will look like this when an email routes from the Internet:
This normal flow is very simple, you have your MX record looked up that will point to Exchnage Online Protection (EOP) then it will route to Exchange Online (EXO) then it will route the mailbox server the the database then it will arrive in your inbox as your mailbox - simples like this:
MX > EOP > EXO > Mail Server > Database > Mailbox
However when you use ICES and you do not update your MX record from EOP the flow then looks like this notice there are now two lines in this flow now:
MX > EOP > EXO > Transport Rule > Send Connector > ICES > ICES scanning > ICES returns to EOP > EXO > Mail Server > Database > Mailbox
This means when a message is sent to your from outside on the internet, just before it would leave Exchange Online (EXO) it is the with a transport rule send a connector that sends the messages to your ICES, from there your ICES scans the emails for threats and if nothing is found it then returns it to Exchange Protection (EOP) which then end back up in Exchange Online (EXO) which then now continues (due to the transport rule having an exclusion to now send it back via ICES when it has come from there just now) on to Exchange Online (EXO)
This can sometimes be referred to has "hair pining" round mail servers, because its enter your environment, leave it, only to come back in when processed.
Message Logs show duplicate messages
When you enable a solution like this you message logs will show double messages, this does not mean the recipient gets two messages but in this case the bottom message is delivered to the ICES solution then when its returned from ICES back to EXO you get the other message (the top one here) that is then delivered to the inbox.
The impact of this can be reduced by a feature called "Skip listing" which you can find under your Defender settings to get there navigate to:
Email & Collaboration > Policies & Rules > Threat policies page > Rules section > Enhanced filtering
That should look like this when you get to the Threat Policy section and you are looking under the Rules section:
When you click "Enhanced Filtering" you will then see a list of applicable connector where it can be enabled and by default they are all "Disabled" as you can see below:
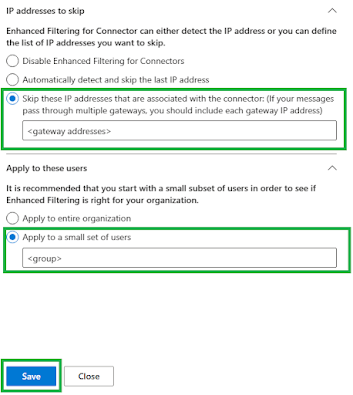
You will need to find the Sending connector that routes e-mails to the ICES solution and click on that connector which will give you some options as below, from here you need to enter all the ICES gateway addresses in the drop box with the option to "skip" and then if you wish to limit this to a group of people you can choose that group in the "apply to these users" option as below:
When you are happy click the Save button, then when you check you connectors you will notice that this single connector will now say "Enabled" as below:
When you have enabled this connector I noticed a difference to the SPF results within the next 15 minutes and it gave me a positive result.
If you would like to read the official article you can check that out here
Still not working as your expect?
This next step depends on your configuration and may require configuration of the Tenant Allow/Block Lists more specifically the Spoofed Senders, first we need to get there and this is located here:
Email & Collaboration > Policies & Rules > Threat policies page > Rules section > Tenant Allow/Block Lists
That should get you to this screen below, click the "Spoofed Senders" option:
You then need to click the add button which will give you the syntax you need to complete this as below, as you can see the syntax is <domain>, <IP> in this example below:
In this example lets say we have two gateway servers, that have impossible addresses, but this is an example so lets use:
Gateway 1 : 40.292.11.55
Gateway 2 : 72.288.4.88
The syntax for these gateways would be as below, first we need a * for any domain then the addresses of the gateways as below, you will need one for Internal and one for External:
Internal – Allow:
*,40.292.11.55
*,72.288.4.88
External – Allow
*,40.292.11.55
*,72.288.4.88
When added that should look like this:


