This is a guide on how to setup a Cloudflare Tunnel setup, WARP split tunneling, network policies, local DNS routing, and ensuring the MacOS device stays awake using pmset
This enables access remotely for my 192.168.86.0/24 home network from anywhere via the WARP client —no public domain, full TLS, fine-grained access, and your Mac mini stays awake 24/7 - with the network card off-line the tunnel fails.
Prerequisites
- Cloudflare Zero Trust account
- Mac mini (or any always-on host in LAN)
- Private subnet:
192.168.86.0/24 - WARP clients on macOS and iOS
Step 1: Install cloudflared on MacOS
curl -L https://github.com/cloudflare/cloudflared/releases/latest/download/cloudflared-darwin-amd64.tgz | tar -xz
sudo mv cloudflared /usr/local/bin/
Step 2: Create Tunnel via Zero Trust Portal
We now need to create the Tunnel, this needs to be provisioned in the dashboard and you then need to connect the tunnel to the "cloudflared" instance you installed in step 1.
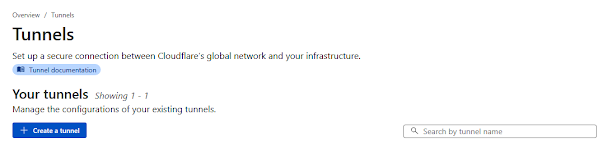
First, we need to go to the Network > Tunnel


I obviously can’t display my version of this command but the syntax for this command is below:
sudo cloudflared service install <YOUR_INSTALL_TOKEN>You can find your install/reinstall token with the screenshot above the command - simply click the copy icon and paste it into your shell.
Next, we need to define public host names or private networks when you set up the tunnel for the first time you will automatically go to public hostnames
Note : I do not want a public tunnel that has a public DNS name. I want a private tunnel so I will not be setting up the public version of this.
This means the default selector can be ignored and we need the option for private networks:

Click on private networks, and you will need to fill in your private network CIDR and then give it a name as below:

Finally, click complete setup to complete your setup, obviously, before we move on, let’s make sure everything is healthy.


You have used the interactive command, the problem with that command is once you log off the tunnel, also terminates you need to use the command highlighted in the guide to make sure it runs in the background as a system service.
Step 3: Define DNS & Routing in config.yaml
Create /etc/cloudflared/config.yaml with:
tunnel: bear-hq
credentials-file: /etc/cloudflared/bear-hq.json

warp-routing:
  enabled: true

dns:
  rules:
    - hostname: nas.bear.local
      type: A
      value: 192.168.86.20
    - hostname: wwwsrv1.bear.local
      type: A
      value: 192.168.86.30

ingress:
  - service: http_status:404
This then maps .bear.local hostnames to devices on your LAN which will ultimately sends all LAN traffic through the tunnel.
Step 4: Confirm Private Route is added
This configuration is completed during the tunnel setup, however, if you would like to check this configuration then from Networks choose Routes:

This will then show you a list of routes and which tunnels they are linked to:

In this instance, the correct CIDR is linked to the correct tunnel.
Step 5: Create Gateway Network Policy
Go to Gateway → Policies → Network → Create policy:

Then it requires a name and we set up the destination network, this will need to be the logic operator of “in” So you can add the full CIDR:


Finally, You can get your rule assessed with the definition assessment tool which should look something like this:

Finally, we now need Create that policy with the blue button saying “Create policy” from the screenshot above.

This permits LAN traffic to pass over WARP (nearly) I have defined it for all users however you can also add an identity here so only certain people can use this rule - this could also be locked down to certain IP addresses and ports if indeed you choose to do that.
Note : If you are looking for more granular network policy rules, please look at step 12 (towards the bottom of this article)
Step 6: Configure Split-Tunnel via WARP
Note : The network policy rule does not work until this step is carried out because this is what gets your traffic to the correct destination, the previous role was simply allowing it at a network level
In Cloudflare Dashboard under Settings → WARP Client → Device Profile - however, the settings are here can get a little bit confusing so let’s go through them with screenshots:
Firstly, from the zero Trust portal click on the menu option and at the bottom of the side menu choose settings:


Next, when you edit this policy, we need to find the tunnel section, we need to ensure this is set to “Include IP and Domains” in this policy, from here we need the click the blue manage button:

You will then need to add the CIDR and the domain name to this list as below:

Your WARP client will show “Protected completely”, meaning your LAN and internet traffic is routed over the tunnel, while excluding only those specific networks you chose.
Step 7: (Optional) DNS Resolver Policy
Instead of hardcoding DNS rules, you may:
- Go to Gateway → Policies → DNS → Resolver Policies
Create rule:
Domain:*.bear.local- Action: Forward to your MacOS IP
- Save for dynamic host resolution
Step 8: Prevent Mac mini from Sleeping
To ensure your tunnel never disconnects:
sudo pmset -a sleep 0 disksleep 0 displaysleep 0
sleep 0disables system sleepdisksleep 0keeps disk activedisplaysleep 0prevents display scanning—important for headless devices
Step 9: Install & Enroll WARP Clients
macOS:
- Install Cloudflare WARP
- In app → Account/Team → sign in with your Zero Trust domain
- Mode should already be “Connected / Protected completely”
iOS:
- Install WARP from App Store
- Tap Use with Teams → enter your domain
- Accept VPN setup, mode set to Gateway with WARP
Step 10: (Optional) Fine-Grained Access with Access Apps
To restrict certain services like SSH or HTTP:
- Go to Access → Applications → Add application
- Choose Infrastructure or Self-Hosted
- Set Hostname/IP (
nas.bear.local:22) or (wwwsrv1.bear.local:443) - Attach policies based on users/groups
Step 11: Verify Everything Works
On WARP-connected device:
nslookup nas.bear.local
ping nas.bear.local
ssh Lee@nas.bear.local
curl http://wwwsrv1.bear.local
These commands should resolve to private IPs and connect over your private network, securely tunneled away from "public" sources and customers.
I actually confirmed this, dropping onto my 5G network and using Terminus (iOS SSH Client) to connect to an internal device via that VPN - this test was successful meaning the tunnel is operational.
ICMP : Ping does not work?
If you are a person that likes a good ping (one ping Vercelli, one ping only) then you will notice that ICMP is not allowed by default which is good, but if you need it enabled then from the setting menu choose Network as below:


Step 12 : Fine Grained network policy rules
If you are looking for more restrictive rules as you may not want to allow your whole local network access to everybody so let’s make that a little bit more fine grained shall we.
You have a couple of approaches to this method and the network rules can get quite specific and granular so let’s start an example. let’s say I only wanted to be able to talk to a device using SSH - which natively runs on TCP:22 - and then not allow everything else for anybody.

Then you need the action to be allowed:

This will then be confirmed in the policy summary as you can see below:

This will mean only TCP:22 will be accepted to that one IP and not the whole network, you can then build your policy's for access out like this, how fine-granted you need to go is down to your individual requirements.