You deciding to deploy an offline Root Certification Authority. The security team started to prepare for deploying the offline root CA. The idea is to create an Enterprise PKI infrastructure that uses advance cryptography and supports SHA-2
Prepare the Windows Machine
Since the root CA will be offline most of the time, it is a recommended to deploy it on a virtual machine.
Machine Specifications:
- 2 GB RAM.
- Normal processing power.
- 40 GB C drive at a minimum.
- Network Card
Note: the network card is needed only during the installation of the Root CA and taking backup. After you finish deploying the Root CA, disconnect the network card and shut down the machine.
Windows Specifications:
- Windows 2012 R2 (Standard or Datacenter) [Preferable not Windows Core].
- Machine name :
- Create the following folders under the C:\ Drive
- C:\CA Database Files\CertDB
- C:\CA Database Files\CertLog
Lock Down the Windows Machine
It is so important to secure the Root CA server. Here is a TechNet article talking about the same subject and applies to all Windows Server versions. Below is my recommendation:
- Apply Windows patches to the Root CA machine.
- Disable CD-ROM Autoplay.
- Disable LM and NTLMv1 authentication protocols.
- Enable and configure inbound and outbound firewall rules using the built-in Windows Firewall.
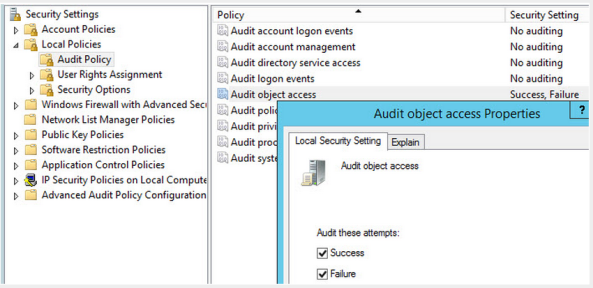
- Enable Audit Object Auditing using the local security policy [This is needed to audit certain CA actions]
- I recommend also to configure the Password Policy using local group policy. In the Local Security editor,configure the password policy as per the below figure:

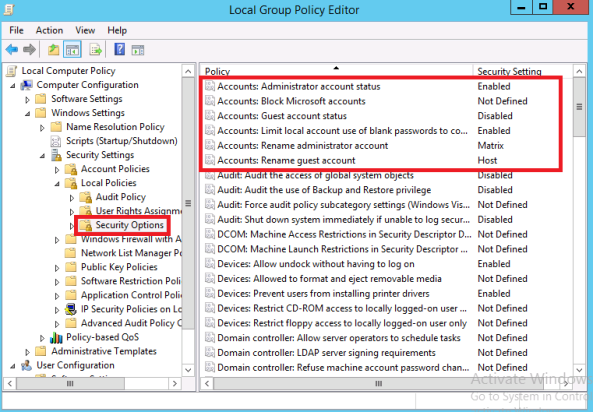
- Rename the local administrator account and the guest account, then disable the guest account, and assign a complex password to the local administrator account.You can use the local group policy to help you and enforce some of those tasks:
- After you finish installing and configuring this Root CA server, disconnect the network card, and power the machine off. I recommend also to export the VM (the OVF file if you are using VMware) on a removable media or backup tape and store it in a very secure location.
Prerequisites
First thing to do is to install the Active Directory Certificate Services and their management tools. I prefer doing the whole installation in PowerShell as this give me the ability to rebuild the whole environment easier.
Since we are working with Windows 2012 R2, then the PowerShell ISE editor is available for us. I prefer open it and run all the PowerShell commands from it.
To open the PowerShell ISE, go to the Windows Search, and type PowerShell ISE
Make sure that the PowerSehll execution policy is set to RemoteSigned by running
1 | Set-ExecutionPolicy RemoteSigned |
Then type:
1 2 | Install-WindowsFeature Adcs-cert-Authority -IncludeManagementToolsInstall-WindowsFeature RSAT-ADCS-Mgmt |
CAPolicy.inf
The CAPolicy.inf file provides Certificate Services configuration information, which is read during initial CA installation and whenever the CA certificate is renewed. The CAPolicy.inf file defines settings specific to root CAs, as well as settings that affect all CAs in the CA hierarchy.
By default, the CAPolicy.inf file does not exist when Microsoft Windows Server is installed. It should be manually created in the Windows operating system folder (%windir% folder). When Certificate Services are installed, the operating system applies any settings defined in the CAPolicy.inf file.
While still in PowerShell ISE Editor, type the following to create a file called CAPolicy with extension .inf :
1 2 | notepad c:\windows\capolicy.inf |
Copy and paste the below into the capolify.inf file you had created.
1 2 3 4 5 6 7 8 9 10 11 12 13 14 15 16 17 18 19 20 21 22 23 24 25 26 27 28 | [Version]Signature="$Windows NT$"[PolicyStatementExtension]Policies=InternalPolicy[InternalPolicy]OID= 1.2.3.4.1455.67.89.5Notice="Corporate Policy Statement"URL=http://www.companyhere.com/PKI/policy.aspx[Certsrv_Server]RenewalKeyLength=2048RenewalValidityPeriod=YearsRenewalValidityPeriodUnits=20CRLPeriod=yearsCRLPeriodUnits=1CRLDeltaPeriod=DaysCRLDeltaPeriodUnits=0LoadDefaultTemplates=0AlternateSignatureAlgorithm=0[CRLDistributionPoint]Empty=True[AuthorityInformationAccess]Empty=True |
Where:
- <Renewalkeylength> : Only used when you renew your CA certificate.
- <RenewalValidityPeriodUnits> and <RenewalValidityPeriod> : Specify the validity of the CA certificate.
- <CRLPeriod> and <CRLPeriodUnits> : Specify the frequency of the CA Revocation publication, which is “which is how often you will be bringing up the offline root CA in order to regenerate the CRL“.
- [CRLDistributionPoint] : Leave blank for Root CA.
- [AuthorityInformationAccess]: Leave blank for Root CA.
- [LoadDefaultTemplates = 0]: Prevents CA for publishing and start using default template and cause undesired enrollment.
- [AlternateSignatureAlgorithm = 0] : configures the CA to support the PKCS#1 V2.1 signature format for both the CA certificate and certificate requests. Because it is not widely supported, we will keep it as 0.
- [PolicyStatementExtension]: is the location the points to your policies [Certificate Practice Statement CPS and Certificate Policy CS]
Install Certification Authority Services
Run the following PowerShell Command:
1 2 3 4 5 6 7 8 9 10 11 | Install-AdcsCertificationAuthority -CAType StandaloneRootCA ` -CACommonName "Company Here Root CA II" ` -CADistinguishedNameSuffix "OU=PKI,O= Company,C=US" ` -KeyLength 2048 ` -HashAlgorithmName SHA256 ` -CryptoProviderName "RSA#Microsoft Software Key Storage Provider" ` -DatabaseDirectory "C:\CA Database Files\CertDB" ` -LogDirectory "C:\CA Database Files\CertLog" ` -ValidityPeriod Years ` -ValidityPeriodUnits 20 |
Configuring Certification Authority Services
Verification
Open CMD and run Certutil -CAInfo , and verify that the CA type is Stand-alone Root CA.
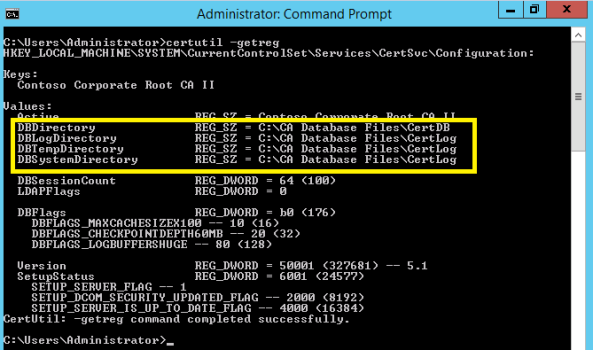
Run Certutil -getreg and verify the database and log locations
Map Namespace of AD
Because the offline root CA is not connected to the domain and does not automatically publish the CRL to Active Directory, you must set a key in the registry to assign a variable that will point to your Active Directory namespace. To do this, at a command prompt, type the following command and then stop and start the CA service:
certutil.exe –setreg ca\DSConfigDN CN=Configuration,DC=Company,DC=comWhere DC=contoso,DC=com is the namespace of the forest root domain. This setting is primarily required for CRLs and CA certificates (AIA) that are published in Active Directory.
This registry value sets the %6 replacement token that is required for the CRL location attribute. You have to restart the certificate services in order for changes to take effect.
CA Time Interval (Frequency) settings
Note that during the installation, we specified the validity period for the CA certificate (20 years).This is because there is no parent CA from which the validity period can be specified. Because this CA will issue future certificate ,there must be a way to specify the validity period for issues certificates. So run the following command from the CMD on the root CA to specify the validity period for the second tier issued certificates.
certutil -setreg ca\ValidityPeriodUnits 10
certutil -setreg ca\ValidityPeriod "Years"
net stop certsvc & net start certsvc
Now, we have to define the CRL interval, CRL Delta interval, and the CLROverLap period by running the following on the Root CA:
certutil.exe –setreg CA\CRLPeriodUnits 26
certutil.exe –setreg CA\CRLPeriod “Weeks”
certutil.exe –setreg CA\CRLDeltaPeriodUnits 0
certutil.exe –setreg CA\CRLDeltaPeriod “Days”
certutil.exe –setreg CA\CRLOverlapPeriodUnits 12
certutil.exe –setreg CA\CRLOverlapPeriod “Hours”
Notice that we have disabled Delta CRL Period, because it is not recommended to enable delta CRLs on the Root CA. To learn more about the best practices of setting these values, please check my previous blog post here.
Configure CDP
CDP stands for Certificate Revocation List Distribution Points, and it points the consumer of your digital certificates where to locate the CRL for your Root CA.
It is recommended to publish the CRL in both Active Active Directory and also on a http web site. Make sure you have a web site accessible using http://pki.contoso.com/CertEnroll , so that we can through the CRL files under that virtual directory.
First of all, use PowerShell to run the following command to empty the default CDP locations
1 2 | $crllist = Get-CACrlDistributionPoint; foreach ($crl in $crllist) {Remove-CACrlDistributionPoint $crl.uri -Force}; |
Then use CMD to configure the new CDP locations [not from PowerShell]:
certutil -setreg CA\CRLPublicationURLs "1:%WINDIR%\system32\CertSrv\CertEnroll\%3%8%9.crl\n10:ldap:///CN=%7%8,CN=%2,CN=CDP,CN=Public Key Services,CN=Services,%6%10\n2:http://pki.contoso.com/certenroll/%3%8%9.crl"The numbers appearing in the previous command represent option variables that you add up. For example, (\n2) means “Include in the CDP extensions of issued certificates“, while (\n10) is the combination of option 8 and option 2, so it means “Include in the CDP extensions of issued certificates” and “Include in all CRLs. Specifies where to publish in the Active Directory when publishing manually“. The below table list those variables:
0 :No Options Defined
1 :Publish CRLs to this location
2 :Include in the CDP extensions of issued certificates
4 :Include in CRLS. Clients use this to find Delta CRL Locations
8 :Include in all CRLs. Specifies where to publish in the Active Directory when publishing manually
64 : Publish Delta CRLs to this location
128 :Include in the IDP extension of issued CRLs
Where as the variables appearing with (%) are another set of variables that you can find more information about here.
Now run certutil.exe -crl command from CMD to generate the new CRL, and drops it as configured, into “C:\Windows\System32\CertSrv\CertEnroll” directory.
Configure AIA
Authority Information Access AIA locations are URLs that are added to a certificate in its authority information access extension. These URLs can be used by an application or service to retrieve the issuing CA certificate. These CA certificates are then used to validate the certificate signature and to build a path to a trusted certificate.
First of all, use PowerShell to run the following command to empty the default AIA locations
1 2 | $aialist = Get-CAAuthorityInformationAccess; foreach ($aia in $aialist) {Remove-CAAuthorityInformationAccess $aia.uri -Force}; |
Then use CMD to configure the new AIA locations [not from PowerShell]:
certutil -setreg CA\CACertPublicationURLs "1:%WINDIR%\system32\CertSrv\CertEnroll\%1_%3%4.crt\n2:ldap:///CN=%7,CN=AIA,CN=Public Key Services,CN=Services,%6%11\n2:http://pki.contoso.com/certenroll/%1_%3%4.crt"
Auditing Certification Authority Services
To enable Auditing on the Root CA server for Certificate Services operation, run the following command from CMD:
certutil -setreg CA\AuditFilter 127
Publish to Active Directory
Now, if you go to C:\Windows\System32\CertSrv\CertEnroll , you will see two files:
- Root CA Public Key (Certificate)
- Root CA Revocation List
Copy those two files to your corporate domain controller (C:\) drive for example, and log on to your domain controller with an account that is member of both Domain Admins and Enterprise Admins. Open an elevated PowerShell and enter the following commands, using the file names for your instance. This will publish the offline root CA information to AD, just as if it were an online CA. By doing this all domain joined clients will automatically trust your root CA. If you have standalone computers, then you can import the .crt file into their trusted certificate store.
certutil.exe –dspublish –f “ContosoRootCA_Contoso Corporate Root CA II.crt” RootCA
certutil –f –dspublish “Contoso Corporate Root CA II.crl”
certutil.exe –addstore –f root “ContosoRootCA_Contoso Corporate Root CA II.crt”
The first command adds the offline root CA public certificate to the AD DS, Configuration naming context. The second and third commands add the root CA and the root CRL to the relevant certificate stores on the subordinate CA.
Tags
Certificates


