If you have a requirement in Teams for people to be able to use Transcription and Close Captions (CC) you need to ensure its enabled in the policy for those are enabled so to check that you navigate to Meetings > Meeting Policies like this:

Then its easier to create a new policy for these settings, therefore you require a new policy for this:

Give the policy a name and a description as below, you can call the name to match you requirements....

Then in the "Recording and Transcription" section ensure "Transcription" is enabled and "Live Captions" is set to Off, but organisers can override" as below:

Option 1 : Assign Policy to a Group of people
First create a group, here we create a group called Allow-TSaCC in AAD with some users in.
Then when you have the group ready, click "Group Policy Assignment" and "Add"

First create a group, here we create a group called Allow-TSaCC in AAD with some users in.
Then when you have the group ready, click "Group Policy Assignment" and "Add"
Then you want to find the group you wish to assign the policy to, with the rank here of 4 (ss I have 3 other in my Lab) and then choose the policy you just created as shown below....

Option 2 : Assign the policy to the user directly
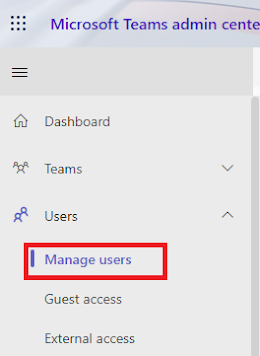
If you do not want a group to apply this to then you can assign this to individual users, to complete that you need to navigate to Users, then Manage Users as below:
Then on the user management search for user in the search box, then click on the view policies option as below:

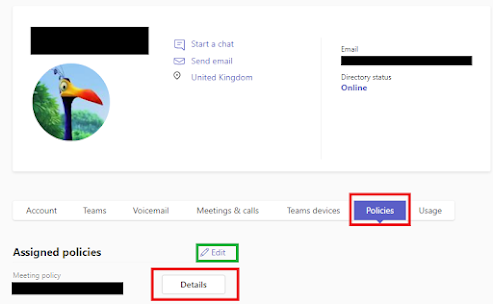
When you click View Policies you will end up on the polices tab as below, you are after the Meeting Policy, once you find that click the details to see how the policy is assigned, however here you want the Edit button above it.....the one in the green box.....
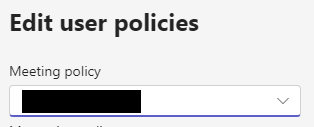
This will show you the options list, from here you will need to choose the policy you just created to apply it.
CAUTION: Once you have assigned the permissions they are not immediate, they may take up to one hour to get the client and even then you may still need to sign out and sign back into Teams client
Check you have the policy applied
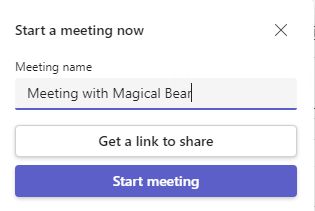
This requires the Team client running and you need to be signed in as that user, once in the Teams client select the Calendar option, then the Meet Now option.....

Then give the meeting a name and click "Start Meeting"
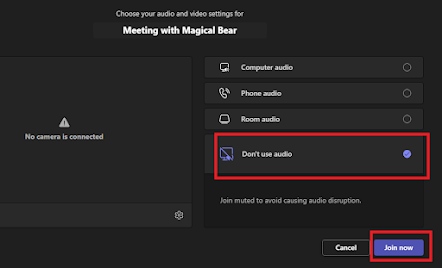
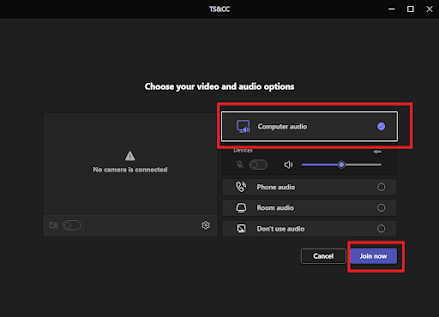
Choose "Don't use Audio" and "Join Meeting" - we are only testing the permissions for now.....
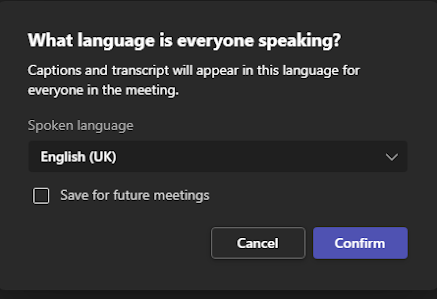
First good sign is you get the "what language are people speaking" here I have chosen English (UK)....
However you will notice here I still have no transcribe option as the policy has not got to my teams clients just yet.....
So I will need to sign-out of Teams and log back into it, to get the new policy, please remember that closing or quitting is NOT a sign out, to sign out you need to rick click the taskbar icon and choose sign out as below:

Then once we are back online in Teams again, you can now see the option is available and ready to use.

Roger that, red leader, time to move on to the next section, now we need to create the Meeting not a Meet-Me option, as you may need to set some meeting options, like in this instance we need to do, so moving right along.
Then when you add people to that group they will be assigned the meeting policy you specified here.
Option 2 : Assign the policy to the user directly
If you do not want a group to apply this to then you can assign this to individual users, to complete that you need to navigate to Users, then Manage Users as below:
Then on the user management search for user in the search box, then click on the view policies option as below:
When you click View Policies you will end up on the polices tab as below, you are after the Meeting Policy, once you find that click the details to see how the policy is assigned, however here you want the Edit button above it.....the one in the green box.....
This will show you the options list, from here you will need to choose the policy you just created to apply it.
CAUTION: Once you have assigned the permissions they are not immediate, they may take up to one hour to get the client and even then you may still need to sign out and sign back into Teams client
Check you have the policy applied
This requires the Team client running and you need to be signed in as that user, once in the Teams client select the Calendar option, then the Meet Now option.....
Then give the meeting a name and click "Start Meeting"
Choose "Don't use Audio" and "Join Meeting" - we are only testing the permissions for now.....
First good sign is you get the "what language are people speaking" here I have chosen English (UK)....
However you will notice here I still have no transcribe option as the policy has not got to my teams clients just yet.....
So I will need to sign-out of Teams and log back into it, to get the new policy, please remember that closing or quitting is NOT a sign out, to sign out you need to rick click the taskbar icon and choose sign out as below:
Then once we are back online in Teams again, you can now see the option is available and ready to use.
Roger that, red leader, time to move on to the next section, now we need to create the Meeting not a Meet-Me option, as you may need to set some meeting options, like in this instance we need to do, so moving right along.
Create the Meeting and delegate co-author Permission
Now we have confirmed we have all the policies active, we need to create the meeting for people to join officially so from the Calendar option click the New Meeting option:

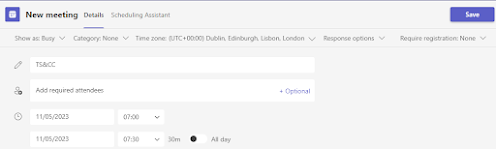
Then you need to give the meeting a name and a time, which you can see here, then click to Save button...
Then from the week view find you meeting based on the date and time you set and click the Join button, I get a blue join button as it is now - not later on.....

Next before anything else we need to tweak some meeting options, this can only be done by the delegate and co-delegates to get to those options, choose More then Settings then Meeting Options as below:
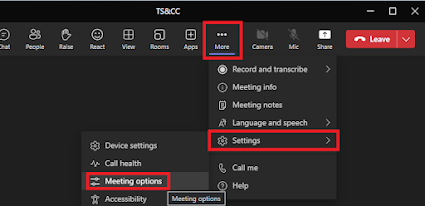
When this loads I have requirements for "bypass lobby" this will mean any people join the meeting immediately, the present options are for meeting owner and delegates to stop other people presenting and finally we want to allow meeting chat - when done do not forget to save it at the bottom of that window.

Live Captions
This is the first feature, to enable this you need to click more>language and speech>turn on live captions that will enable live captions in the meeting.....

Once enabled once you talk you will see that the live captions appear on the screen like this:

However if you are not speaking English you may wish to change that, so for that in the live captions section click on the "three dots" and then choose "change spoken language"

Then you need to select the language that will appear in live captions, so if you choose Welsh and Talk English it will appear in Welsh.....

The the Live captions will be in Welsh, this will apply for the every participant

Transcription of the Meeting
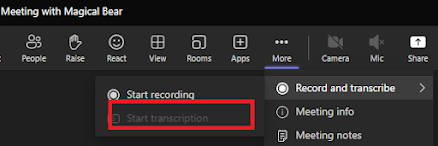
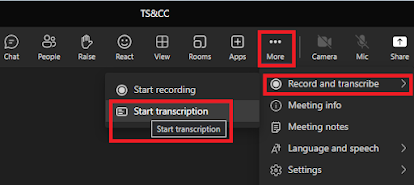
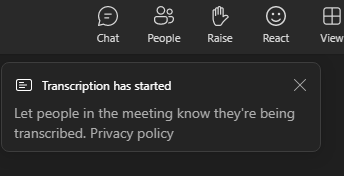
This will transcribe what is said in the meeting in the chat windows usually, to turn this on choose More>Record and Transcribe then Start Transcription as below:
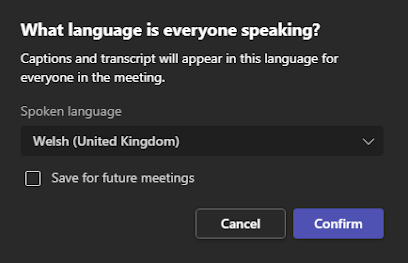
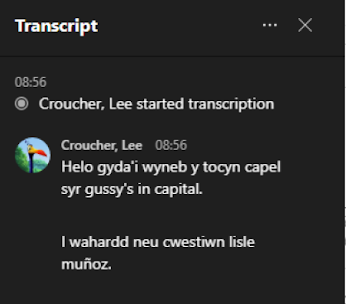
When you select this option you will get the option to chose the spoken language again, once again choose the spoken language, here I will chose Welsh as an example:
Once you click continue you will get the notification to tell you its enabled as below:
Then you will see your transcription on the right side of the meeting window like this:
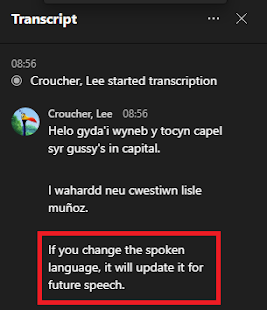
If you wish to change the spoken language mid meeting you can do with the three dots then change spoken language as below:

This will only change the language from that point and does not retro update the previous speech at all, which is quite a good idea in my view.
Live Captions and Transcription together
Yes you can do this as well, to complete this enable the Live Captions like this first:

Then you need to enable transcription next like this:
Once both are enabled this is what you get in the teams client, you can see both live captions and transcription.....

Recording the Meeting
The last option is to record the meeting, which will record attendance, crate a transcript copy and also video record the screen content for later playback at a more convenient time.
Once you meeting is running this can be done from More > Record then Start Record as below:

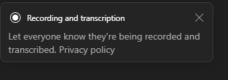
You should get a notification to say both are running as below:
This is what it looks like with all options enabled, here you can see live captions, transcription and recording all active....

Post-Meeting Data
This section only applies when the meeting has concluded and you have ended the recording (by leaving the meeting as the host)
Then you need to give the meeting a name and a time, which you can see here, then click to Save button...
Then from the week view find you meeting based on the date and time you set and click the Join button, I get a blue join button as it is now - not later on.....
This time you need computer audio as it needs to hear you speak for the features to work, I will be using computer audio with an iPhone as well.......
Next before anything else we need to tweak some meeting options, this can only be done by the delegate and co-delegates to get to those options, choose More then Settings then Meeting Options as below:
When this loads I have requirements for "bypass lobby" this will mean any people join the meeting immediately, the present options are for meeting owner and delegates to stop other people presenting and finally we want to allow meeting chat - when done do not forget to save it at the bottom of that window.
Live Captions
This is the first feature, to enable this you need to click more>language and speech>turn on live captions that will enable live captions in the meeting.....
Once enabled once you talk you will see that the live captions appear on the screen like this:
However if you are not speaking English you may wish to change that, so for that in the live captions section click on the "three dots" and then choose "change spoken language"
Then you need to select the language that will appear in live captions, so if you choose Welsh and Talk English it will appear in Welsh.....
The the Live captions will be in Welsh, this will apply for the every participant
This will transcribe what is said in the meeting in the chat windows usually, to turn this on choose More>Record and Transcribe then Start Transcription as below:
When you select this option you will get the option to chose the spoken language again, once again choose the spoken language, here I will chose Welsh as an example:
Once you click continue you will get the notification to tell you its enabled as below:
Then you will see your transcription on the right side of the meeting window like this:
If you wish to change the spoken language mid meeting you can do with the three dots then change spoken language as below:
Live Captions and Transcription together
Yes you can do this as well, to complete this enable the Live Captions like this first:
Then you need to enable transcription next like this:
Recording the Meeting
The last option is to record the meeting, which will record attendance, crate a transcript copy and also video record the screen content for later playback at a more convenient time.
Once you meeting is running this can be done from More > Record then Start Record as below:
You should get a notification to say both are running as below:
This is what it looks like with all options enabled, here you can see live captions, transcription and recording all active....
Post-Meeting Data
This section only applies when the meeting has concluded and you have ended the recording (by leaving the meeting as the host)
Once the meeting is over navigate back to your Chat section and find the meeting name as below:

Then you will see all the options for downloads in that chat window as below, here you can see the options below which includes the video and the transcript....

Add Closed Captions to Video
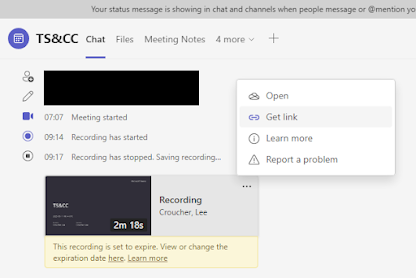
If you wish closed captions to added to the video you will notice they are missing from the video as they are not recorded as part of the video, which is a weird quirk, so click on the three dots then choose get link and copy the link.
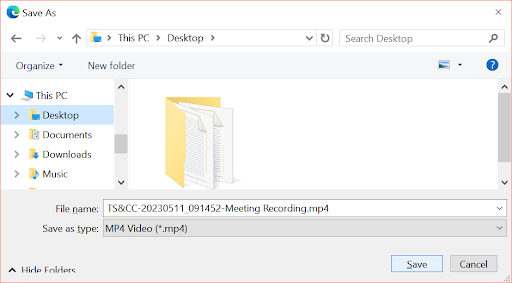
Once you have the link visit that is a web browser and it will look like this, where you need the three dots again and then choose Download.....

Save the file to a location of your choice....
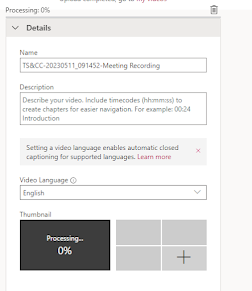
Once you have the file you then you MS Steam to add the captions to the video which can be accessed here
Then you need the Upload video button:

Select the file and it will upload like this:
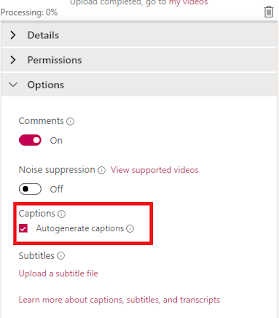
Click on the Options and ensure Captions and Auto generate captions is enabled as below:
This will then add the captions to the video automagically, and you will also get the transcript from the video to the right as shown below, however ensure you click the CC button to get the captions enabled......

Not forgetting the transcript for viewing......

Bring you own Interpreter
If you wish closed captions to added to the video you will notice they are missing from the video as they are not recorded as part of the video, which is a weird quirk, so click on the three dots then choose get link and copy the link.
Once you have the link visit that is a web browser and it will look like this, where you need the three dots again and then choose Download.....
Save the file to a location of your choice....
Once you have the file you then you MS Steam to add the captions to the video which can be accessed here
Then you need the Upload video button:
Select the file and it will upload like this:
Click on the Options and ensure Captions and Auto generate captions is enabled as below:
This will then add the captions to the video automagically, and you will also get the transcript from the video to the right as shown below, however ensure you click the CC button to get the captions enabled......
Not forgetting the transcript for viewing......
Warning: When you set the interpreter before the meeting and you need to change the interpreter, from the Teams application, running on windows you have the option to make interpreter or make attendee - if you make someone an interpreter, it will ask you the original and destination language before they are promoted, if you remove all the interpreters when people join they will still get the option unless you turn it off in meeting room options - not very fluid and quite clunky.
If you have a dedicated interpreter then you need to set that up in the meeting as well, so to get this setup you need to access the meeting options in Teams, firstly join your meeting....
Once joined you require More>Settings>Meeting Options

Then find the Language Interpretation and turn it on as below:
Then you need to choose your interpreter which will be a delegate of the meeting abd then the Source to Target Language then click save.....as below....

Then when people join the meeting and require in this example Welsh, they will only hear the interpreter that is doing the translation, if they switch back to the source language they will not be able to hear the interpreter until the meeting organiser makes them a "source" delegate and removes then from the "target" language" role.
Once joined you require More>Settings>Meeting Options
Then find the Language Interpretation and turn it on as below:
Then you need to choose your interpreter which will be a delegate of the meeting abd then the Source to Target Language then click save.....as below....
Then when people join the meeting and require in this example Welsh, they will only hear the interpreter that is doing the translation, if they switch back to the source language they will not be able to hear the interpreter until the meeting organiser makes them a "source" delegate and removes then from the "target" language" role.
If people are joining the meeting and wish to switch the language from original to the designated language, if they are using iOS devices. This will natively work, if they are using the latest version of the teams client this will also work, if the attendees have an old version of Teams, this option may be missing.
Finally, if you have attendees joining the meeting, using the web version and they are using windows, computers, or macOS please remember they will need to make sure all this software and updates our current, failure to complete this step will result in some abnormal behavior when trying to select the interpreter language, mainly the interpretive box, seems to vanish behind the actual meeting when, trying to choose the option for which language you would like to hear.